
Living tiny doesn’t mean sacrificing your morning coffee ritual. In a space where every square inch earns its keep, a dedicated coffee station can transform your routine without eating up precious counter real estate. Whether you’re brewing a single cup or hosting friends in 200 square feet, smart design makes it possible. This guide walks through the equipment, storage strategies, and layout tricks that turn a cramped corner into a fully functional coffee bar that actually works.
Table of Contents
ToggleKey Takeaways
- A dedicated tiny house coffee station eliminates morning chaos and keeps clutter off multipurpose surfaces by housing all gear—grinder, beans, mugs, and filters—in one designated zone.
- Vertical storage solutions like wall-mounted rails, magnetic strips on cabinet doors, and under-shelf baskets maximize space without adding footprint in compact living areas.
- Compact coffee makers such as pour-over systems, single-serve pod machines, and manual espresso makers take up minimal counter space while delivering quality results without sacrificing functionality.
- Smart design choices—including fold-down shelves, slide-out platforms, and corner nooks—transform cramped spaces into fully functional coffee bars that work efficiently in tiny houses.
- Proper placement near water sources and storage, combined with adequate lighting and accessible height (32-36 inches), ensures your coffee station supports both daily rituals and guest visits.
- A functional tiny house coffee station typically costs $150-$600 and includes thoughtful touches like organization systems and intentional layout that reinforce the space is designed, not just crammed.
Why Coffee Stations Matter in Tiny House Living
In a tiny house, routines anchor the day. A well-planned coffee station eliminates morning chaos and keeps clutter off multipurpose surfaces that double as dining tables, prep counters, or workspaces.
Efficiency beats square footage. When coffee gear lives in one designated zone, grinder, beans, mugs, filters, there’s no hunting through cabinets or rearranging the kitchen for a single cup. Time saved compounds over weeks.
Vertical space is underused gold. Most tiny house dwellers focus on horizontal surfaces, but walls, cabinet doors, and the underside of shelves offer storage without footprint. A coffee station leverages these planes better than almost any other kitchen setup.
The psychological benefit matters, too. A dedicated spot for something you love signals that tiny living isn’t about deprivation, it’s about intentionality. That mindset shift shows up in how people design the rest of their space.
Building codes and permits don’t typically govern coffee stations unless you’re adding outlets or modifying structure. If you’re installing new electrical for a high-draw espresso machine, check NEC requirements for kitchen circuits (typically 20-amp for countertop appliances). Most portable setups plug into existing outlets without issue.
Essential Equipment for a Tiny House Coffee Setup
Compact Coffee Makers That Fit Small Spaces
Pour-over systems take up the least footprint, a ceramic dripper, kettle, and mug stack to under 6 inches of counter depth. Brands like Hario V60 or Kalita Wave deliver café-quality results and store in a single drawer. The downside: manual pour-overs require attention and a separate heat source.
Single-serve pod machines (Keurig K-Mini, Nespresso Essenza) measure around 5 inches wide and brew in under two minutes. They’re ideal for one or two people who value speed. Pod waste adds up, though: reusable pods cut costs and landfill load if you’re willing to hand-fill them.
Compact drip makers like the Zojirushi 5-cup sit at roughly 9 inches wide and brew enough for a couple or guests. Look for models with thermal carafes, they skip the hot plate, saving energy and counter depth.
Manual espresso makers (AeroPress, Flair) require no electricity and produce espresso-style coffee in a 4-inch footprint. The Flair PRO 2 delivers legitimate 9-bar pressure but demands arm strength and a separate grinder. AeroPress is more forgiving and doubles as a travel brewer.
Avoid built-in coffee systems unless you’re doing a custom build with dedicated cabinet space. They lock you into a single solution and complicate future changes.
Smart Storage Solutions for Coffee Supplies
Coffee supplies multiply: beans, filters, syrups, backup pods, cleaning tools. Containing them without cabinets full of clutter takes deliberate design, as highlighted in many small space living guides.
Magnetic strips mounted inside cabinet doors hold metal scoops, clip-bag closures, and small tools. A 12-inch strip costs under $10 and recovers dead door space.
Tiered lazy Susans (6-8 inch diameter) fit corner cabinets and spin to reveal syrups, sweeteners, and backup supplies without digging. Choose a model with 2-inch lips to prevent items from sliding off.
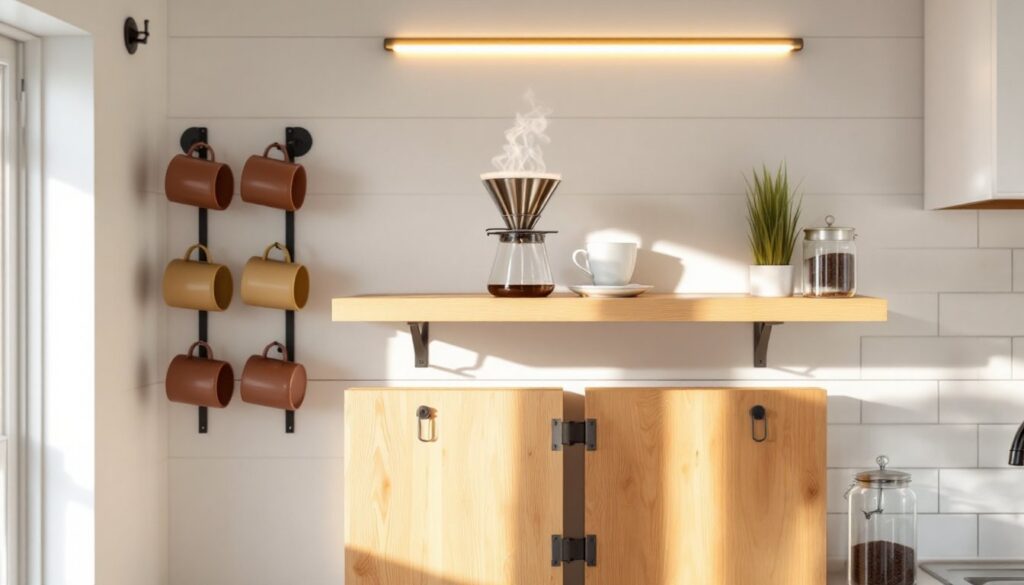
Wall-mounted rails with S-hooks suspend mugs vertically. A 24-inch rail holds 6-8 mugs and frees an entire shelf. Mount into studs or use heavy-duty drywall anchors rated for 50+ pounds if you’re attaching to shiplap or thin paneling common in tiny builds.
Airtight canisters preserve beans and grounds while stacking neatly. OXO POP containers (rectangular, not round) use corners efficiently. A 2.5-quart canister stores a pound of beans and measures 4 x 4 x 7 inches.
Under-shelf baskets clip onto existing shelves and create a second tier for filters, stir sticks, or tea bags. Choose wire over solid plastic for visibility.
For those designing accessible layouts, position frequently used items between 15 and 48 inches high, and avoid deep, back-of-cabinet storage that requires reaching or bending.
Creative Design Ideas for Your Tiny House Coffee Bar
Location dictates function. A coffee bar squeezed into the wrong spot creates bottlenecks and unused potential.
Fold-down shelves mounted to a wall above counter height drop down to create a 12-18 inch prep surface, then tuck flat when not in use. Use continuous hinges (piano hinges) rated for the shelf width, and install folding shelf brackets rated for at least 100 pounds if you’ll rest a grinder or machine on the surface. Secure to wall studs, not just drywall.
Slide-out cutting boards installed in place of a standard drawer become pull-out platforms for a pour-over setup or grinder. They’re common in RV supply shops and mount on full-extension drawer slides rated for 75-100 pounds. This works best in kitchens with at least 12 inches of depth between counter edge and wall.
Corner nooks waste less space than you’d think. A triangular floating shelf (24 inches per side) fitted into an inside corner holds a maker, mugs, and canisters. Use heavy-duty corner brackets or build a cleat system into the studs for support.
Above-the-sink stations take advantage of an area rarely used beyond dish drying. A narrow shelf (6-8 inches deep) mounted 18-24 inches above the sink keeps the coffee station out of primary prep zones. Ensure the shelf doesn’t interfere with faucet reach or window operation.
Lighting matters more in tiny spaces. An under-cabinet LED strip (warm white, 2700K) positioned above the coffee zone eliminates shadows and makes early mornings less groggy. Puck lights work if you’re mounting to open shelving. Both options draw minimal power and wire into existing circuits without a permit in most jurisdictions.
Open shelving vs. closed cabinets: Open shelves speed access and make small spaces feel larger, but they collect dust and visual clutter. For coffee stations, a hybrid approach works, open for mugs and daily gear, closed for backup supplies and less photogenic items.
Color and material choices affect perceived space. Light-colored wood (maple, birch) or white shelving reflects light and recedes visually. Darker tones (walnut, espresso stain) add warmth but can shrink a space if overused. Match your coffee station material to existing cabinetry for cohesion, particularly in designs that prioritize compact living strategies.
Power and water access: If your station sits far from outlets, a 15-amp surge protector with a flat plug (Tripp Lite makes a good one) snakes behind cabinets more easily than bulky models. Never daisy-chain power strips or run extension cords under rugs, it’s a fire risk and violates NEC 400.8.
For stations near the sink, consider a gooseneck faucet with extended reach, which fills kettles and pots without lifting them into the basin. A pull-down sprayer also works but takes more sink deck space for installation.
DIY considerations: Building a custom coffee bar shelf or fold-down table requires basic carpentry skills and tools. You’ll need a circular saw or miter saw for cutting lumber to length, a drill with countersink bit, wood screws (#8 x 1.5-inch for 3/4-inch material), and a level. For wall-mounted elements, a stud finder is non-negotiable, drywall anchors alone won’t support the weight of a loaded coffee setup.
If the coffee maker draws over 1,000 watts (common for espresso machines), confirm your circuit can handle it alongside other kitchen appliances. Standard kitchen small-appliance circuits are 20-amp, 120-volt, supporting up to 2,400 watts, but a toaster and microwave on the same circuit can trip breakers.
For tiny houses on wheels, secure all components against movement. Use non-slip shelf liners, bungee cords for taller items, or barrel bolts to lock fold-down shelves during travel. Coffee gear rattling loose at highway speeds can shatter glass carafes or damage electronics.
Many kitchen design resources emphasize the “work triangle” concept, sink, stove, fridge. In a tiny house, the coffee station is a fourth node. Ideally, it sits within a step or two of water (for filling) and storage (for beans and filters), but outside the main cooking zone to avoid congestion during meal prep.
Safety note: Always unplug coffee makers and grinders when not in use, especially in tiny houses where appliances sit closer to water sources or combustible materials. Use GFCI-protected outlets in wet areas per NEC 210.8. If you’re unsure whether your outlets have GFCI protection, test them with a plug-in tester (under $10 at hardware stores) or hire an electrician.
For those managing limited mobility or designing for guests, ensure the station doesn’t require overhead reaching or floor-level bending. A counter-height setup between 32-36 inches, with frequently used items stored at elbow height, works best. This aligns with principles used in accessible tiny house design.
Maintenance and cleaning: Small spaces amplify messes. Keep a small bin or drawer near the station for coffee grounds disposal and a microfiber cloth for quick wipe-downs. A knock box (for espresso pucks) can fit in a 5-inch cabinet and simplifies cleanup. For drip machines, a monthly vinegar descale cycle prevents buildup and extends lifespan. Run a 1:1 water-vinegar solution through a full brew cycle, then two plain water cycles to rinse.
Budget expectations vary by region and material choice, but a functional tiny house coffee station typically costs $150-$600. That includes a mid-range maker ($50-$300), storage solutions ($30-$100), and basic DIY materials for shelving ($20-$200). High-end espresso setups or custom cabinetry push costs higher. Shop secondhand for makers and mugs, thrift stores and estate sales often have barely used gear.
Finally, don’t overlook the small touches that make a station feel intentional: a simple organization system for filters and scoops, a small plant or artwork above the setup, or a favorite mug hung in reach. These details cost little but reinforce that the space is designed, not just crammed.
Conclusion
A compact coffee station proves that tiny house living isn’t about compromise, it’s about smart choices. With the right equipment, vertical storage, and intentional layout, even the smallest kitchen can support a full coffee ritual without clutter or wasted space. Start with the gear that fits your brewing style, then build the station around it.